Tutorial: Working with RAW image files
Working with RAW image files can be an extremely rewarding experience. Yet, many feel intimidated by a file format that often comes out of the camera drab and lifeless, software that can feel foreign, and a general sense of “I don’t know what I’m doing.” Thankfully, there is an excellent application called Raw Therapee that makes working with RAW files very easy. For me, it has almost entirely eliminated my need to use Photoshop for image processing. Best of all, it’s free!
I’ve put together this tutorial to show the basic steps in working with RAW using Raw Therapee. I do not claim to be an expert, and this is not a definitive tutorial. My goal is to show others how easy RAW can be, and to help them get started. To learn more about working with Raw image files in Raw Therapee I recommend reading the Raw Therapee User Manual.
There are a great number of reasons that you should be working in RAW. The main difference between a RAW camera file and a JPEG file of the same image is that the RAW file is a lossless format (no compression) that contains all of the camera data – allowing you to make changes to the image in processing that you could have made in the camera when shooting. JPEG images are processed by the camera, often brightened and sharpened. While you can work with JPEG files, there isn’t the same amount of control that you have with a RAW file.
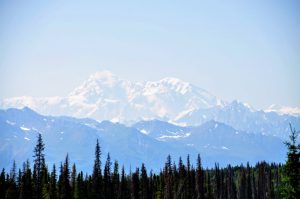
Let’s use this image as an example. This image is under-exposed, and the white balance is incorrect. I know this because I balanced the camera for direct sunlight – this is all shadow – and I purposely darkened the exposure. Using software like Raw Therapee you can make changes to the exposure and white balance as if you were still taking the picture. If this were a JPEG I’d practically have to dismiss this image as lost.
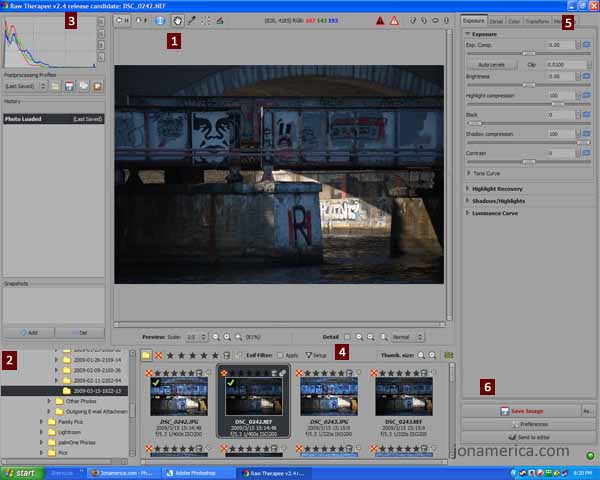
The layout of Raw Therapee is pretty straight forward and well thought out.
- Image display area.
- Directory list
- The histogram – it’s good to keep your eye on this while working with the image
- Image thumbnails – the first time you load a directory it will take some time to create thumbnails of each image. You can see the image I’m working with is highlighted.
- This area has all of the tools you’ll be using to edit your image
- And finally, output.

The first step when working with a RAW image is to adjust the white balance. You can see in the image above that I’ve selected the color tab and slid the Temperature slider to the right. The more I move it to the right the warmer the image becomes. Moving it to the left makes the image cooler. You can see the original inset for comparison. Make fine adjustments to the tint.

You can also use the spot white balance tool for selecting an area in the image that you feel is balanced – typically something white or gray. I’ve turned on the detail option, which I’ll be using to look at image details during the rest of the process. You can see the white balance selector tool in the middle of the detail area.
Rarely is anything perfectly balanced in nature. In fact, most whites have a good amount of blue in them and can actually throw off the white balance a bit. If you’re persnickety about your white balance you can purchase a professional white balance card to use with your pictures. They are easy to use – you just have to remember to use them.
After white balancing, I do any Transform operations (resizing, cropping, rotation, etc). However, this is not the time to downscale the image for other uses – websites, email, etc. – you’ll want to do that last. If you were going to upscale, now would be the time to do it.
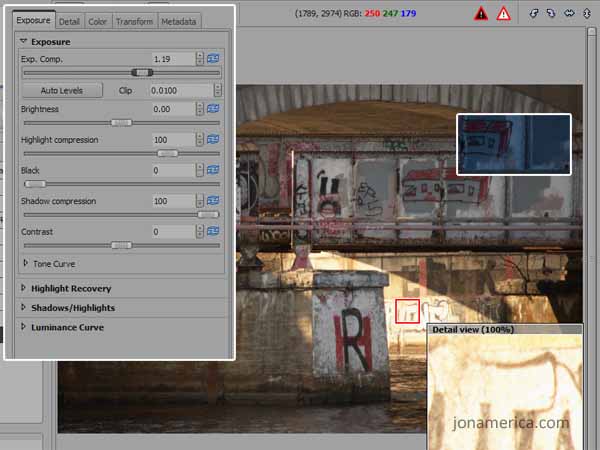
After adjusting white balance I return to the Exposure tab to adjust the exposure. The image was fairly dark, so I’ve raised the exposure a little bit. This had the effect of washing out some of the detail in direct light under the bridge. In a JPEG file once an area is washed out the detail is lost. In RAW the information in the washed out pixel still exists and can be recovered.
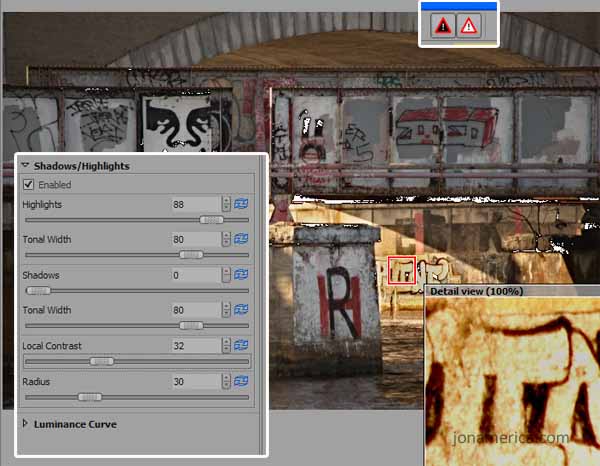
To recover information from an area that is washed out enable the Shadows/Highlights tool and adjust your highlights – the higher the number the more the highlights are reduced. Here you can see that I’ve recovered the area that was being washed out by direct sunlight without darkening the whole image. You can also reduce the shadows, but be careful, the image can become void of black or white, which can look very weird.
Then I adjust the Local Contrast. This is a very useful tool and has a subtle effect. It sharpens the image, gives it a three-dimensional feel, and can reduce atmospheric haze or the fog of shooting through a window. This will not effect the overall contrast of the image like the contrast slider in exposure.
In the image above I’ve enabled the clipping indicators, and you can see where the blacks are being clipped. Clipping indicates that information is being lost, either blacked or whited out, and may be an indication that an image has been lightened or darkened too much.
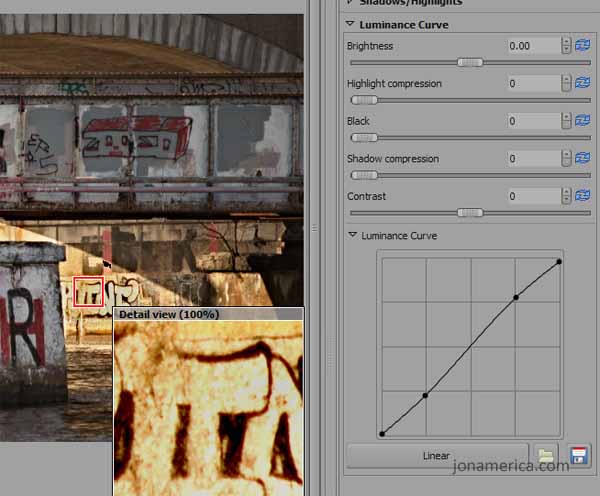
You can also do similar work with the luminance curve. By lightening the dark areas or darkening the light areas you can regain lost information within the image.
After I’m finished making adjustments to highlights and shadows, I make final adjustments to the exposure, brightness, and overall contrast of the image.
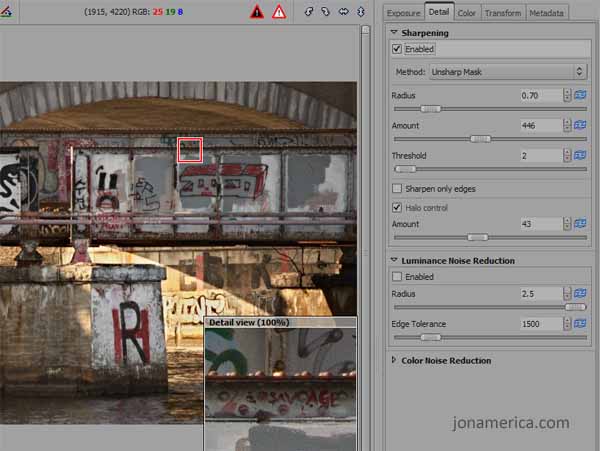
Once the image has the color, exposure and contrast that I want, I go to the Detail tab for the final step – sharpening the image. The Unsharp Mask tool in Raw Therapee works the same as in Photoshop. I set my Radius to 0.70 and my Threshold to 2, then adjust the amount until it looks sharp, but is free of halos (solid black lines around details). The halo control tool eliminates halos when you’ve sharpened too aggressively, but you shouldn’t need to use it – if you’re seeing halos then you’re sharpening too much.
That’s it, you’re done! Now, these are just the basic steps. There is so much more to this program, and so much more you can adjust – I’m just scratching the surface.
When you get the image how you like it you can export it to another format (TIFF or JPEG, etc), or, if you need to make other adjustments (like dodging or burning) you can send it to your editing software.
There are two more processing steps that I do in Photoshop before an image is complete.
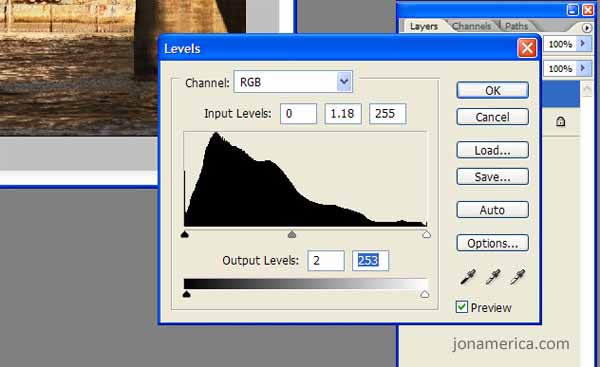
First, I adjust the Output Levels by subtracting 2 from each end. I do this for printing purposes – it prevents odd pixelization in the absolute blacks and whites. This is unnecessary if you aren’t printing, and even then it may not be absolutely necessary, unless you notice such a thing in your prints.

This next step is a tip I picked up from my friend and fellow photographer Alex. Copy the image into a new layer, then select Gaussian Blur from the filter menu. Blur the image until it looks soft, but details aren’t lost, usually around a 15 pixel radius.
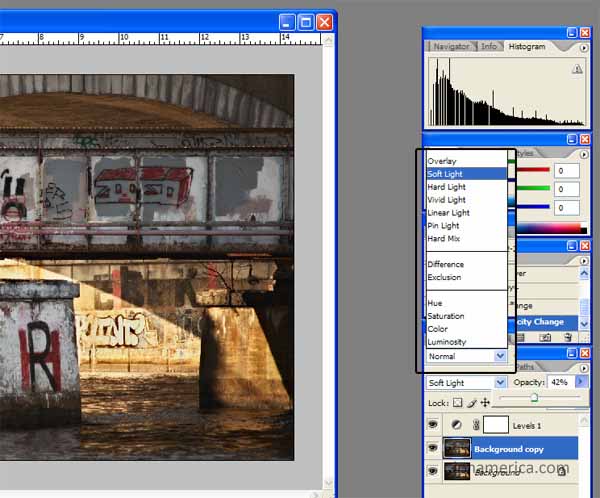
Then, select either soft light, hard light, or vivid light, etc and adjust the opacity. I like the look of soft light, and typically adjust the opacity to around 40%. This has the effect of adding more depth to the image. It also removes digital noise by softening the image without losing detail. It’s a great effect.
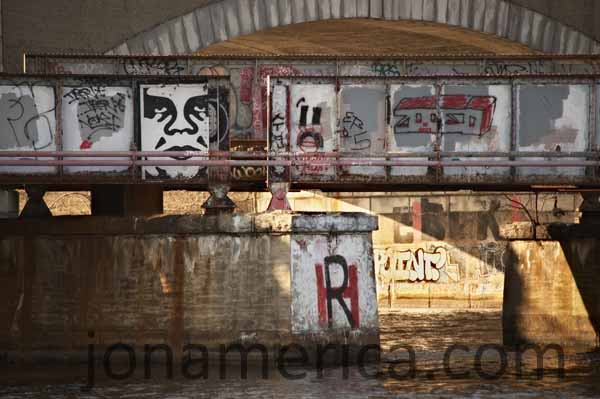
So, here’s the final image. It’s quite a change from where we started. Best of all, everything was done without losing detail or information. If I wanted to go back and start over I could do so. More red, more contrast, darker, lighter – all of the image information is still contained within the RAW file.
By shooting in raw you are able to correct incorrect white balance, change the exposure, regain information from bright or dark areas, sharpen, increase contrast, and give images more three-dimensionality. The reward of working with RAW is that it allows you, the photographer, to concentrate on composition, focus, and message when shooting – three things that can’t be adjusted by software.