MythTV II: Return of MythTV

Less than a year ago I ventured into the realm of MythTV. My previous ramblings on the subject dealt almost entirely with the hardware end of things. I decided to use the lasted releases of Ubuntu and MythTV as an excuse to recreate the entire system, learning from the first experience, and documenting my setup and configuration to create this MythTV install guide.
Changes From Previous Setup
There are two hardware adjustments to my initial setup. First, I’ve altered the hard drives, adding a 5th 250gb drive and ditching RAID5. MythTV 0.21 has a new feature, storage groups, which enables MythTV to save video files to specific locations. If you want more room, simply mount a large drive to /var/thisiswheremyvideosare, then add the mount point to the default storage group in MythTV. With this new setup the system won’t need to manage a software RAID5 whenever I’m watching or recording television.

The other change was to my remote control setup. Lirc had been nothing but a pain since I started monkeying around with it. I replaced the homebrew serial IR receiver with one that was already well supported and well documented in MythTV-dom, a Windows Media Center, or MCE remote. Best, decision, EVER.
Initial Setup
I’m going to walk through my Ubuntu setup, including RAID1. If you’re not going to do any RAID at all you can download the standard Ubuntu setup CD. Otherwise, be sure to download the alternate CD.

The setup process is pretty self-explanatory, but partitioning drives and RAID setup can get a little tricky. With most Linux distributions you only need to have two specific locations across the entire system, one for / (root) and one for swap. If you’re not sure what to do, let the system make recommended partitions on one of the drives.
After you get to the partition window you’ll want to select each drive and hit return, this will clear existing partitions. Then select the free space on one of the drives and hit return. Then select “Automatically partition the free space”

For me, Ubuntu created two partitions, one primary ext3 partition mounted at / and a swap partition. The size of the partitions will depend on the size of the drive and the amount of physical RAM. Repeat these steps for the remaining drives. I partitioned two 250GB drives with 247GB for / and 3.1 GB for swap. The other three drives I added after the initial install.

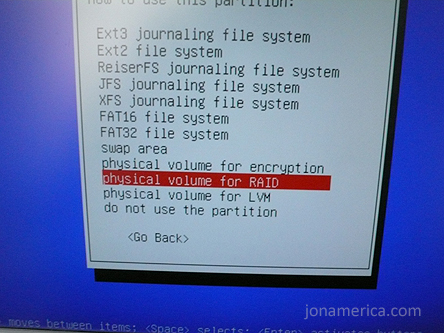
Now select the primary partitions on each drive. After hitting return you’ll see the screen to the left. Hit return again on ‘Use As:’ and select ‘physical volume for RAID.’ Then select ‘Done setting up the partition.’ Do this for as many partitions as you want in your RAID. For my RAID1 setup I selected RAID for all 4 partitions.

Select ‘Configure software RAID.’ It will ask you if you’re sure you want the changes to be written. Select yes. Then select ‘Create MD device.’ Select the RAID type you want to install. Enter the number of devices for the RIAD (2 for my setup), and enter the number of spare drives for the RAID (0 for me). Now you should see the partitions you set as physical volume for RIAD listed. Select all the partitions you are going to use. Now select finish.

You’re now back at the partition menu where you’ll see a RAID device listed. Select the partition, as before, and now use the entire partition as you see fit. I mounted the entire 247GB partition as Ext3 mounted to /, very simple. Repeat this process for the two swap partitions, creating a second MD device. Mount that new RAID device as swap.
Once you have everything setup, select ‘Finish partitioning and write changes to disk.’ The system will now format the new RAID partition and start the install process.
Follow the prompts to finish the Ubuntu install, there shouldn’t be anything overly complicated.
System Configuration

Before you know it, you’ll have a sparkly new Ubuntu box. Now there are some basic setup items to handle.
Right out of the box the system is going to synchronize the RAID. The install only loads the system files to one drive, so mdadm needs to bring the other drive(s) into sync. You can the status of this occasionally by running Terminal (in the applications menu) and typing
cat /proc/mdstat
You can wait for the drive to by synchronized. If you’re like me, you won’t wait.
Before doing anything else it’s best to download and install any updates. Go into the system menu and select Update Manager. Enter your password and then click, ‘Check for updates.’ Download and install. You can’t install any other applications while this is running, so go ahead and watch mdadm try desperately to keep up with all the changes.
After the update the system will prompt you to reboot. If you have a nVidia video card don’t, you’ll want to enable restricted drivers first, which will save you a reboot later. Under the System menu select drivers and enable the NVidia driver. Now reboot.

Installing MythTV is simple under Ubuntu, but don’t get ahead of yourself. Before installing MythTV you need to decide if you’re going to run it under a specific MythTV account, or under your own account. MythTV may contain some security holes, and running it under your own account may allow others access to files on that account. If you’re going to be using the system for something else, (fileshare, Web server, backup, etc) you may want to create a new user called mythtv and do the install from there. This is the recommended setup.
If you’re not going to do that you’ll want to create a group called mythtv and add the username of the account that you’ll run MythTV from to the mythtv group. Both are done from ‘User and Group Settings’ in the system menu.
In whichever account you use, you’ll want to change the power management so that the system never sleeps, deactivate the screen saver, disable system beeps, and turn the volume all the way up. You may also want to set the MythTV account to login automatically, which can be done in User and Groups Settings.
Lirc Installation

You should be logged into the account that you’ll be running MythTV from. In the system menu run Synaptic Package Manager. The package manager is very easy to use. You can search for and select programs you want to install. If there are prerequisites for a selected program the manager will let you know and select them for you. There are a number of programs required for MythTV to run, the manager will get them all for you.

I started with LIRC. During the install process the configuration wizard asked for the type of receiver I was using. I selected ‘Windows Media Center Remotes (new version Philips et al.).’ This is the what you want if you pick up a version 2 MCE Remote, which I strongly recommend.
Normally at this point you’d go through a painful process of creating the configuration files for the remote. This took me several hours to complete adequately, and I never liked the results. Instead of doing that, search for and install mythbuntu-lirc-generator in the package manager. Then open up a terminal window and run
mythbuntu-lirc-generator
This will create all the files you need for your remote to work with MythTV. If you want to test your remote you’ll need to restart lirc. This will require admin privlages:
sudo /etc/init.d/lircd restart

Then you can run
irw
and start pressing buttons on your remote. On screen you should be seeing random numbers followed by the name of the button you pressed. There are some very helpful community docs on installing lirc. If you’re going a different route.
MythTV Installation

Do a search for Myth in the package manager. You’re looking for three items: mythtv, mythtv-themes, and mythplugins. Note: If you don’t want all of the plugins then don’t select mythplugins. If you’re not sure, start off with mythtv and myth-themes. You can always add plugins one at a time, depending on what you want. There are plenty of places on the net where you can read about plugins.
During the install you’ll be prompted to answer a number of questions. You’ll be asked to supply a password for the MySQL root user. It is recommended that you leave this blank, as it has been known to cause errors during setup. If you are concerned about security go ahead and enter a password. If you run into a problem it’s likely you’ll only need to created the mythtv user in MySQL and set the password. Easily done, but if you aren’t familiar with MySQL it may be a bit of a pain.
You’ll see a message about running mythtv-setup, we’ll do that in a minute. You’ll also be asked if you want to allow remote connections to the backend. If you are planning on having a remote frontend, or multiple fronteneds you’ll want to answer yes. If you select no, you can always enable it later. The install process will generate a password for MySQL user mythtv and store this information in /etc/mythtv/mysql.txt. You may need to refer to this later.
That’s it, we’re installed!
MythTV Configuration
There are 6 menus to go through. For the most part configuration of the backend is simple. I’ll walk you through the basics of getting up and running. There is plenty of documentation already out there that covers tweaking MythTV.
From the System, Administration menu select ‘MythTV Backend Setup.’ Under the first option, General, you’ll need to set your ‘TV Format’ (NTSC in the U.S.) and your ‘Channel frequency table’. If you’re using MythTV for over-the-air broadcast in the U.S. select us-bcast.

In the Capture cards menu you need to select (New capture card). If you’re using a pcHDTV tuning card select DVB DTV for your card type. If you have more than one turning card repeat this step, changing ‘DVB card number.’
In the Video Sources menu you want to select SchedulesDirect.org. You’ll need to sign-up with SD ($20 / year). In the setup window enter your SD login and password.
Now you need to select Input connections to associate the Capture cards with the Video sources. Select the card you want to edit, then select your video source for that card. Next click ‘Scan for channels.’ This will initiate your channel scan (you’ll want your antenna/cable source hooked up at this point). If you don’t get a lock on any channels check your antenna/cable connection. If that doesn’t resolve the issue try changing the ‘Channel frequency table’ in the General menu. Repeat this for all capture cards.
The Channel Editor window allows you to edit the channels that were picked up in scanning. You can hide, delete, and rename channels here.
Lastly, the Storage Directory window is where you specify the path where videos will be stored. I added three hard drives to my system and mounted them to /var/videos/drive1, 2, and 3. In the Storage Directory menu I selected (default), edited the default location to drive1 and added the 2nd and 3rd drive locations respectively. Within MythTV you can specify which recordings go to which storage group. If you wanted to create groups other than default this is where you would set up the different groups. If you only want one group for all videos simply select default.
You can now exit the configuration. You’ll be prompted to run mythfilldatabase, go ahead and do so. This will pull television information from schedulesdirect.org and fill your program guide.
You can now run the MythTV frontend from the applications menu!
You will find there are 100s of options for adjusting and configuring MythTV. I’m not going to go into any of them. The specifics of your system will determine these settings. Indeed there were many backend settings that we skipped for the same reason. Read about all of these options and determine what’s best for your system. I would recommend, however, enableing OpenGL, if you have a video card that supports it.
I’m running video out to my HDTV from a DVI – HDMI cable. This provides a supurb image quality. However, there is a horrible issue of overscan. You may also run into this issue if you’re using your MythTV setup with a TV instead of a computer monitor. There is plenty of information out there to help. The easiest solution is to ignore the overscan and adjust the size of the MythTV window, which can be independent from the desktop.
Useful Links
Here’s my list of useful links that have been indispensable to me:
General links:
MythTV Home
Ubuntu Home
Install Documentation:
MythTV Install Documentation
Install Lirc on Ubuntu
Hardware links:
pcHDTV Tuner Cards
MCE Remote
Solid Signal (Source for internal/external antennas)
Overscan/Modeline Links:
Modeline Database (Very handy source for verified Modelins for TVs)
Working with Modelines
General Support:
Ubuntu Community Documentation
pcHDTV Forums (great for getting tech support)
MythTV pcHDTV Wiki page
nVidia Linux Support Forum
AV Science Forum for Linux base HTPCs Fantastic support resource.
Conclusion
Tweaking MythTV is a long, complicated, but rewarding process. It can make the difference between smooth and jerky playback. Once you have a configuration you like I recommend documenting it thuroughly. In the past I’ve had to completely reset my MythTV installation and lost all of my settings.
Building your own MythTV based HTPC can be rewarding. Hopefuly this guide makes it a little easier to get started.


